Dockerising a Full Stack (SQL, aspnetcore, React) application with a nice F5 experience
I work in Managed Services, and we end up with a lot of projects on different versions of things (node, packages, dotnet, etc)
So I want to get a full stack project with good F5 debugging experience and easy onboarding that can run without those dependencies!
I succeeded! Kinda…
Contents
I had to do a LOT of reading for this, and the final code solution is here on Github.
This is a POC! I’m not saying this is how to do it and it’s the best way to do it.
This is the way I did it, and it seems to work, but I’m sure there are better ways.
Goals #
My goal here is simple: I want a template project for how to create a dockerised environment.
I want a new dev coming onto a project to be able to:
- Get up and running quickly without having to worry about databases (or data), specific versions of things like node or dotnet, etc
- Have a low friction development experience (i.e. F5 in Visual Studio, simple database and UI execution and update)
The end solution is a standard Create React App that GET’s from an Api which queries an SQL database, all from within Docker.
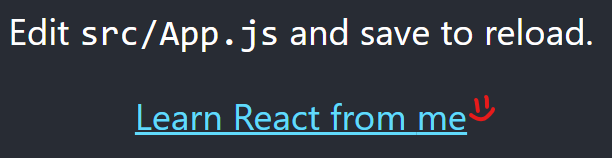
We’ll be able to visit https://localhost:3000 and see the standard CRA app, where the “Learn React” link now says “Learn React from {Name from Database entry}” (in this demo, it’ll be ‘Learn React from me’).
Setup #
- Windows
- WSL2 with Ubuntu distro installed (with NodeJS installed, but also without)
- Visual Studio 2022 (with Container Tools installed)
- VSCode (with Remote-WSL and container extensions installed)
- Docker Desktop with Linux containers
- Some basic working knowledge of Docker (there are images and containers, and commands like FROM, and COPY, a tool called ‘compose’, etc)
Setup/Startup gotchas to avoid #
I ran into some issues when working through these, so we’ll start on the right foot this time.
WSL2 default distro #
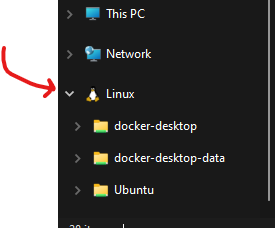
Somehow, my default distro was set to docker-desktop which is not right at all…
It was causing all sorts of problems, like the docker command not working, along with other commands just not behaving like I expected them to.
Ensure your default WSL2 distro is set to something proper (Ubuntu for me).
You can check with wsl --list, and set it with wsl -s Ubuntu (for example)

File watching issues in WSL #
File watching across the Windows/WSL file system boundary is currently
not working correctly.
The scenario was that I had my code at C:/Source and everything was working, but Hot Reload wasn’t detecting changes, regardless of file watcher settings (CHOKIDAR, etc)
The workaround is to place the code in the WSL2 file system and just run it from there.
I did this by opening a WLS2 Ubuntu shell (or just opening a terminal and typing wsl), navigating to ~, typing explorer.exe . and using Windows Explorer to drop my code in there.
Due to the above issues, let’s just start this whole thing in WSL2 ~ in a folder of your choice.
Let’s begin! #
Project Structure #
Create the following folder structure in the WSL root ~.
The folder of your choice
├── UI
├── API
├── SQL
├ docker-compose.yaml
If you’re unsure how to do so, there are a few methods to get to WSL and set this up.
My go-to is opening VSCode (doesn’t matter where) and searching for “Remote-WSL: New Window” which will open a new VSCode window at the Linux root (running through WSL properly), and you can create the folders in VSCode.

Another way is to navigate to the Linux file system in Windows Explorer, and create the folders from there.
The last I can think of is navigating there using the Command Line.
Windows Terminal has a built in WSL profile, or on any other Command Line running wsl will give you a prompt in your current folder (cd ~ to get to the Linux root)
ENSURE YOU’RE IN THE WSL FILE SYSTEM FROM NOW ON!!
Database (Sql) #
Let’s start with the bottom layer of the app.
Inside the SQL folder, create DockerFile_SQL with the following contents:
DockerFile_SQL
docker
FROM mcr.microsoft.com/mssql/server:2019-latest

WORKDIR /app

COPY . .

# Set scripts to be executable. Note that I had to change user for permissions.
USER root
RUN chmod +x ./initialise-sql.sh
RUN chmod +x ./entrypoint.sh
USER mssql

CMD /bin/bash ./entrypoint.sh
FROM mcr.microsoft.com/mssql/server:2019-latest
WORKDIR /app
COPY . .
# Set scripts to be executable. Note that I had to change user for permissions.
USER root
RUN chmod +x ./initialise-sql.sh
RUN chmod +x ./entrypoint.sh
USER mssql
CMD /bin/bash ./entrypoint.shI want the dev experience to be as frictionless as I can, so let’s get a setup script to initialise the database for us.
SQL Server doesn’t allow this implicitly, so we’re going to have a custom entrypoint called entrypoint.sh.
This script starts sqlserver, but also starts another script which initialises our database.
entrypoint.sh
bash
# Run Microsoft SQl Server and initialization script (at the same time)
/app/initialise-sql.sh & /opt/mssql/bin/sqlservr# Run Microsoft SQl Server and initialization script (at the same time)
/app/initialise-sql.sh & /opt/mssql/bin/sqlservrinitialise-sql.sh
bash
# Sql Server container can take some time to start up.
# This may need to be tweaked per machine, e.g. I can set this to 10s and it's fine
sleep 30s
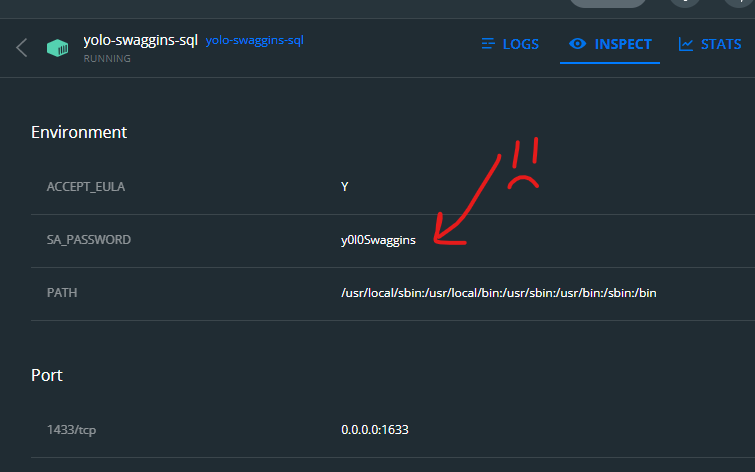
# Note the SA password here as well.
# Ideally, I'd have an environment variable to handle this (maybe we can use the SA_PASSWORD one?)
/opt/mssql-tools/bin/sqlcmd -S localhost -U sa -P y0l0Swaggins -d master -i /app/InitialSQL.sql# Sql Server container can take some time to start up.
# This may need to be tweaked per machine, e.g. I can set this to 10s and it's fine
sleep 30s
# Note the SA password here as well.
# Ideally, I'd have an environment variable to handle this (maybe we can use the SA_PASSWORD one?)
/opt/mssql-tools/bin/sqlcmd -S localhost -U sa -P y0l0Swaggins -d master -i /app/InitialSQL.sqlThe container starts SQL server, waits for it to get set up, then runs a sql script against the DB using the username and password setup by docker compose ( later).
The docs recommend this kind of script also update the
sapassword since it’s exposed as an environment variable in Docker (and thus anyone who looks at the container can see it)
Also note that the password has some rules to follow, check the docs for more info.
InitialSQL.sql
sql
-- Basic DB setup script for testing
-- This script runs every container start, BUT the data isn't destroyed when the container is stopped, only when it's removed.
-- As such, let's only run this initialisation when we need to.
USE master
GO
-- Create the new database if it does not exist already
IF NOT EXISTS (
SELECT [name]
FROM sys.databases
WHERE [name] = N'Swag'
)
CREATE DATABASE Swag
GO
USE Swag
GO
IF OBJECT_ID('[dbo].[Yolo]', 'U') IS NOT NULL
DROP TABLE [dbo].[Yolo]
GO
CREATE TABLE Yolo (Id INT, DisplayName NVARCHAR(50), SwagAmount INT)
GO
INSERT INTO Yolo VALUES (1, 'me', 9001)
GO-- Basic DB setup script for testing
-- This script runs every container start, BUT the data isn't destroyed when the container is stopped, only when it's removed.
-- As such, let's only run this initialisation when we need to.
USE master
GO
-- Create the new database if it does not exist already
IF NOT EXISTS (
SELECT [name]
FROM sys.databases
WHERE [name] = N'Swag'
)
CREATE DATABASE Swag
GO
USE Swag
GO
IF OBJECT_ID('[dbo].[Yolo]', 'U') IS NOT NULL
DROP TABLE [dbo].[Yolo]
GO
CREATE TABLE Yolo (Id INT, DisplayName NVARCHAR(50), SwagAmount INT)
GO
INSERT INTO Yolo VALUES (1, 'me', 9001)
GOMature naming, I know. I was having a bit of a day when I started this project!
Once all that is done, we have a database container that, when run, will contain an initialised database with some dummy data.
API #
I used Visual Studio to create a new NET 6 project with Docker Support.
- Aspnetcore web app
- NET 6
- Tick “Enable Docker” and “Linux”
I’m 100% sure you can do the same with the
dotnet newcommand, but I didn’t investigate.
This leaves us with a folder and .sln inside the Api folder, which is important as Visual Studio uses Fast Mode to build when debugging. There are examples of turning it off and making it run the Docker build properly, but I did not investigate as for this example (and many of my actual projects) we don’t need to do anything tricky in the dockerfile.
Create DockerFile_API in the project folder directory (as below)
Current structure
Expand/Collapse
The folder of your choice
├── UI
├── API
├───── YourProjectFolder
├──────── Dockerfile
├───── .dockerignore
├───── YourProject.sln
├───── DockerFile_API
├── SQL
├───── DockerFile_SQL
├───── entrypoint.sh
├───── initialise-sql.sh
├───── InitialSQL.sql
├ docker-compose.yaml The folder of your choice
├── UI
├── API
├───── YourProjectFolder
├──────── Dockerfile
├───── .dockerignore
├───── YourProject.sln
├───── DockerFile_API
├── SQL
├───── DockerFile_SQL
├───── entrypoint.sh
├───── initialise-sql.sh
├───── InitialSQL.sql
├ docker-compose.yaml Edit the VS Dockerfile and DockerFile_API as below.
DockerFile_API
Expand/Collapse
docker
# This is the Dockerfile we use during the main stack build.
# NOT used for F5 in Visual Studio, that's in ./DockerTest
# This is essentially what I got from doing Right Click --> Add --> Docker support on the project
# I've just fixed the paths and exposed port 5555
FROM mcr.microsoft.com/dotnet/aspnet:6.0 AS base
WORKDIR /app
EXPOSE 80
EXPOSE 443
EXPOSE 442
EXPOSE 5555
FROM mcr.microsoft.com/dotnet/sdk:6.0 AS build
WORKDIR /src
COPY ["./DockerTest/DockerTest.csproj", "/src"]
RUN dotnet restore "/src/DockerTest.csproj"
COPY ./DockerTest .
RUN dotnet build "/src/DockerTest.csproj" -c Debug -o /app/build
FROM build AS publish
RUN dotnet publish "/src/DockerTest.csproj" -c Debug -o /app/publish
FROM base AS final
WORKDIR /app
COPY --from=publish /app/publish .
ENTRYPOINT ["dotnet", "DockerTest.dll"]# This is the Dockerfile we use during the main stack build.
# NOT used for F5 in Visual Studio, that's in ./DockerTest
# This is essentially what I got from doing Right Click --> Add --> Docker support on the project
# I've just fixed the paths and exposed port 5555
FROM mcr.microsoft.com/dotnet/aspnet:6.0 AS base
WORKDIR /app
EXPOSE 80
EXPOSE 443
EXPOSE 442
EXPOSE 5555
FROM mcr.microsoft.com/dotnet/sdk:6.0 AS build
WORKDIR /src
COPY ["./DockerTest/DockerTest.csproj", "/src"]
RUN dotnet restore "/src/DockerTest.csproj"
COPY ./DockerTest .
RUN dotnet build "/src/DockerTest.csproj" -c Debug -o /app/build
FROM build AS publish
RUN dotnet publish "/src/DockerTest.csproj" -c Debug -o /app/publish
FROM base AS final
WORKDIR /app
COPY --from=publish /app/publish .
ENTRYPOINT ["dotnet", "DockerTest.dll"]Visual Studio Dockerfile
# Can't really add/change anything here, it won't matter (Fast mode ignores everything outside base)
FROM mcr.microsoft.com/dotnet/aspnet:6.0 AS base
WORKDIR /app
EXPOSE 80
EXPOSE 443
EXPOSE 442
EXPOSE 5555Note the default MS dockerfile has lots of caching and multi-stage builds for performance
I’ll refer to running the Visual Studio Dockerfile as the “F5 container” throughout this article.
Why have two dockerfiles? I’ll discuss it later, but I do have reasons!
Let’s add EFCore and create a simple endpoint that returns the first row from the database container.
Program.cs
Expand/Collapse
cs
using Microsoft.EntityFrameworkCore;
var builder = WebApplication.CreateBuilder(args);
builder.Services.AddDbContext<YoloDbContext>(opts => opts.UseSqlServer(builder.Configuration.GetConnectionString("SQL")));
var app = builder.Build();
// Weird. The type "HttpContext" is required to be able to return "item"
// If the type is omitted (even though it's the same type?), you can't return "item", only Task
// Even if you go "Task.FromResult(item)" nothing is sent back in the response.
// So explicit type it is.
app.MapGet("/api/items", (HttpContext context) =>
{
var dbContext = context.RequestServices.GetRequiredService<YoloDbContext>();
var item = dbContext.Yolo.First();
return item;
});
app.Run();using Microsoft.EntityFrameworkCore;
var builder = WebApplication.CreateBuilder(args);
builder.Services.AddDbContext<YoloDbContext>(opts => opts.UseSqlServer(builder.Configuration.GetConnectionString("SQL")));
var app = builder.Build();
// Weird. The type "HttpContext" is required to be able to return "item"
// If the type is omitted (even though it's the same type?), you can't return "item", only Task
// Even if you go "Task.FromResult(item)" nothing is sent back in the response.
// So explicit type it is.
app.MapGet("/api/items", (HttpContext context) =>
{
var dbContext = context.RequestServices.GetRequiredService<YoloDbContext>();
var item = dbContext.Yolo.First();
return item;
});
app.Run();YoloDbContext.cs
Expand/Collapse
cs
using Microsoft.EntityFrameworkCore;
public class YoloDbContext : DbContext
{
public class Item
{
public int Id { get; set; }
public string DisplayName { get; set; }
public int SwagAmount { get; set; }
}
public YoloDbContext(DbContextOptions<YoloDbContext> opts) : base(opts) { }
public DbSet<Item> Yolo { get; set; }
}using Microsoft.EntityFrameworkCore;
public class YoloDbContext : DbContext
{
public class Item
{
public int Id { get; set; }
public string DisplayName { get; set; }
public int SwagAmount { get; set; }
}
public YoloDbContext(DbContextOptions<YoloDbContext> opts) : base(opts) { }
public DbSet<Item> Yolo { get; set; }
}Caveats! #
With this split setup, the F5 version builds on the host and is copied into the container due to Fast Mode.
It can be turned off, but I think it’s fine for many cases.
It’s why I also wanted to be able to run up the full stack entirely inside Docker, while still being debuggable.
Were I to have a project like this where the build couldn’t be run on the host, I could run up the stack and attach the debugger OR disable Fast Mode and use the Dockerfile properly.
Achieving a nice debugging experience in Visual Studio #
I very much want to have an F5 experience with this API project in Visual Studio.
The key is ensuring the same URL is used to address the F5 AND the DockerFile_API containers.
I’ll expose port 5555 in both Dockerfiles, and adjust the Visual Studio Launch Settings to get Kestral to run on port 5555.
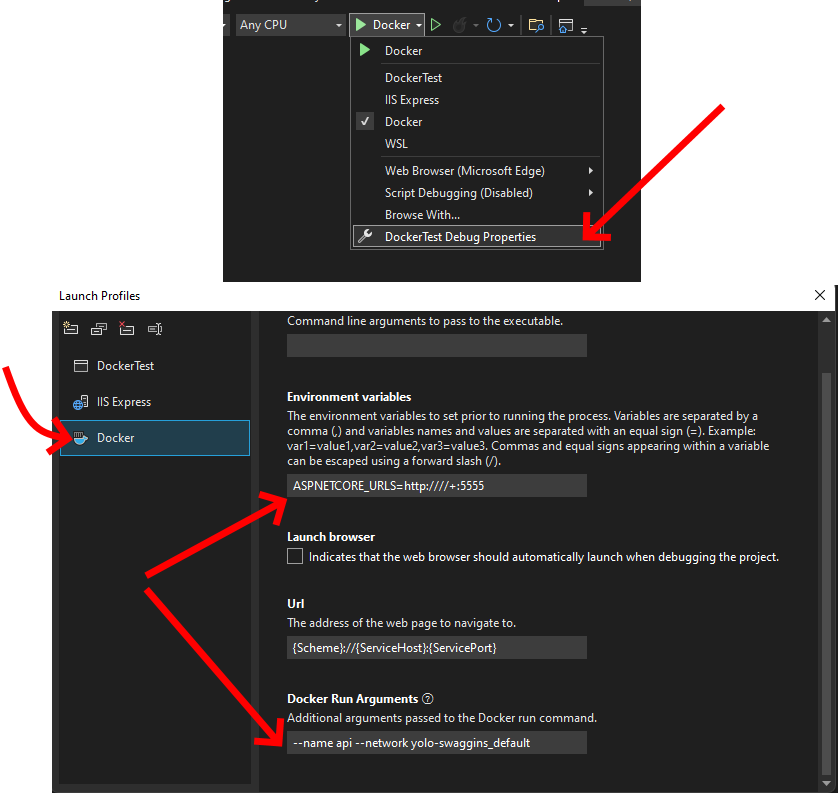
In the launch settings, you can also see the container name and network are set to api and my mature naming standards respectively.
Docker containers are isolated by default, so my F5 container can’t talk to any of my other containers unless we hook it up.
When we setup
Docker Compose later, the other containers will run in a private bridge network, and this configuration adds the F5 container to that network.
Further, by setting the name of the container to api, the other containers can address it by http://api:5555.
We’ll set the Compose API project container name to api as well, meaning we won’t need to edit the UI project files in order to change which container it uses (F5 or Compose stack)
Pretty cool!
This means that we can set the connection string in AppSettings.json to: "SQL": "Server=sql;Database=Swag;User Id=sa;Password=y0l0Swaggins;", as the Sql container will be named sql (we’ll set that up later using Docker Compose)
I also set httpPort to 5555 in launchsettings.json so I can access it externally. This likely isn’t required.
UI #
I use NodeJS installed in WSL here, but you could set this up without it, fully inside Docker, but I wanted the Dev experience to be able to use npm commands later on.
See further on for a solution WITHOUT NodeJS on WSL (Full Docker!!!)
I’m going to use Create-React-App to spin up a quick React project to play with.
Once it’s all setup, let’s create DockerFile_UI:
DockerFile_UI
docker
FROM node:14-alpine AS development
WORKDIR /app
# This is separate so layers are cached nicely
COPY ./package.json .
COPY ./package-lock.json .
RUN npm ci
CMD ["npm", "start"]FROM node:14-alpine AS development
WORKDIR /app
# This is separate so layers are cached nicely
COPY ./package.json .
COPY ./package-lock.json .
RUN npm ci
CMD ["npm", "start"]The
layers caching comment highlights that the container won’t do npm ci or any of the other steps unless package.json or package-lock.json changes, keeping our builds nice and fast!
For this basic example, let’s edit App.js and call the Api endpoint and display the data from the database.
App.js
jsx
import logo from './logo.svg';
import './App.css';
import { useEffect, useState } from 'react';
function App() {
// Basic setup to fetch data from the API and save it in state for use in the UI.
const [text, setText] = useState('');
useEffect(() => fetch('/api/items')
.then(response => response.json())
.then(data => setText(data.displayName)));
return (
<div className="App">
<header className="App-header">
<img src={logo} className="App-logo" alt="logo" />
<p>
Edit <code>src/App.js</code> and save to reload.
</p>
<a
className="App-link"
href="https://reactjs.org"
target="_blank"
rel="noopener noreferrer"
>
Learn React from {text}
</a>
</header>
</div>
);
}
export default App;import logo from './logo.svg';
import './App.css';
import { useEffect, useState } from 'react';
function App() {
// Basic setup to fetch data from the API and save it in state for use in the UI.
const [text, setText] = useState('');
useEffect(() => fetch('/api/items')
.then(response => response.json())
.then(data => setText(data.displayName)));
return (
<div className="App">
<header className="App-header">
<img src={logo} className="App-logo" alt="logo" />
<p>
Edit <code>src/App.js</code> and save to reload.
</p>
<a
className="App-link"
href="https://reactjs.org"
target="_blank"
rel="noopener noreferrer"
>
Learn React from {text}
</a>
</header>
</div>
);
}
export default App;If you were to run that, it won’t work 😊
We need to proxy the request to our Api, ideally avoiding issues like Cors. Fortunately, Create React App supports exactly this.
In package.json, add "proxy": "http://api:5555", as we set our api container name to api and our Kestral port to 5555.
Docker Compose #
All those Dockerfiles are great, and you could tweak them to run together as they are, but let’s get them all chummy and more easily controlled.
Create docker-compose.yaml in the root (as per the
project structure):
docker-compose.yaml
yml
version: '3.9'
services:
# UI Container spec. note that 'ui' is the name of the container internally (also 'container_name')
ui:
container_name: yolo-swaggins-ui
image: yolo-swaggins-ui
environment:
- CHOKIDAR_USEPOLLING=true # This allows CRA to hot reload over the file system barrier
- BROWSER=none
- NODE_ENV=development
build:
context: ./UI
dockerfile: DockerFile_UI
target: development
volumes:
- ./UI:/app # Mount these as volumes so we can watch them.
- /app/node_modules # I think this was so it didn't overwrite or copy or something...
ports:
- 3000:3000
# Database Container spec.
sql:
container_name: yolo-swaggins-sql
image: yolo-swaggins-sql
environment:
ACCEPT_EULA: 'Y'
SA_PASSWORD: 'y0l0Swaggins'
build:
context: ./DockerDB
dockerfile: DockerFile_SQL
ports:
- 1633:1433 # Map 1433 from inside the container to 1633 host to avoid port conflict with local install
# API container spec.
api:
container_name: yolo-swaggings-api
image: yolo-swaggins-api
build:
context: ./Api
dockerfile: DockerFile_API
environment:
ASPNETCORE_ENVIRONMENT: Development
ASPNETCORE_URLS: http://+:5555version: '3.9'
services:
# UI Container spec. note that 'ui' is the name of the container internally (also 'container_name')
ui:
container_name: yolo-swaggins-ui
image: yolo-swaggins-ui
environment:
- CHOKIDAR_USEPOLLING=true # This allows CRA to hot reload over the file system barrier
- BROWSER=none
- NODE_ENV=development
build:
context: ./UI
dockerfile: DockerFile_UI
target: development
volumes:
- ./UI:/app # Mount these as volumes so we can watch them.
- /app/node_modules # I think this was so it didn't overwrite or copy or something...
ports:
- 3000:3000
# Database Container spec.
sql:
container_name: yolo-swaggins-sql
image: yolo-swaggins-sql
environment:
ACCEPT_EULA: 'Y'
SA_PASSWORD: 'y0l0Swaggins'
build:
context: ./DockerDB
dockerfile: DockerFile_SQL
ports:
- 1633:1433 # Map 1433 from inside the container to 1633 host to avoid port conflict with local install
# API container spec.
api:
container_name: yolo-swaggings-api
image: yolo-swaggins-api
build:
context: ./Api
dockerfile: DockerFile_API
environment:
ASPNETCORE_ENVIRONMENT: Development
ASPNETCORE_URLS: http://+:5555Docker Compose is about container orchestration, and lets us connect and control the separate containers more easily.
In this case, the main things we get for free are a bridge network connecting all three containers, and the ability to build and run them all in one command.
The network this creates was mentioned in the
API section, and is required to get the F5 container in Visual Studio connecting to the SQL and UI containers.
This network is named whatever the stack name is (usually the root folder name) + “_default” by default.
You can view docker networks usingdocker network list
Running it all up #
Now, in the root, run docker compose up and the app will “just work”.
You can visit http://localhost:3000 and see the page with “Learn React from me” showing!
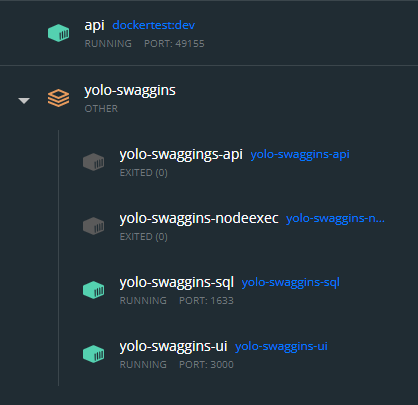
We’ve got it all running! If you open Docker Desktop, you can see the containers all listed there.
Running in stack

Debugging with Visual Studio F5
It’s running in Docker, and here’s where I found that this is where many of the other blog posts and articles finished.
I’m more interested in what it’s like to actually WORK with this result, so what does that look and feel like?
The Debugging Experience. Did I succeed? #
Let’s take a look at the experience working with each of the three pieces.
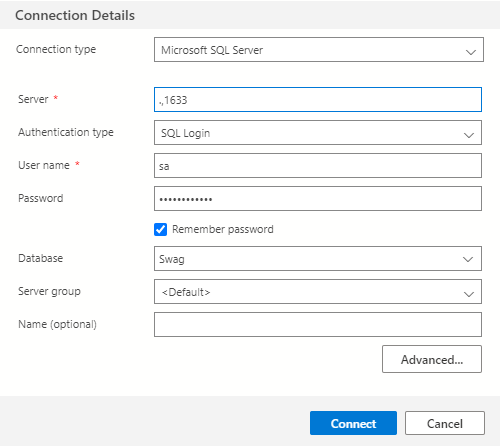
Database #
In the docker-compose.yaml, I mapped the database container port 1433 –> 1633 on the host, so we can connect to it as we would any other database.
API #
I wanted to be able to F5 the solution, and I can!
All the normal workflows are fine here EXCEPT tests, and the build is run on the host which could cause issues for projects that have issues with WSL or Windows.
I go over that a bit
later
Otherwise…Good!
UI #
I wanted to be able to open the solution in VSCode, run npm start, edit files, and see the results.
I didn’t quite get that…
Editing files and Hot Reload work as expected, but running the code isn’t what I wanted.
We need to open VSCode at the root, so we have docker-compose.yaml available, and then we can run a bunch of docker commands like docker compose up ui to run the UI only so we don’t have to spin sql up and down.
I added some scripts to help out, but they currently don’t work because my
NodeJS in WSL is broken and now I can’t debug them…
They need to be tweaked to use the docker compose
Overall #
There’s some edges to things, but all in all, pretty good!
Personally, I’d rather learn some docker commands and have to clone into WSL instead of following a huge Readme with environment customisations throughout.
Revisiting some issues and decisions #
Let’s go back and take a look at some decisions and choices and the reasoning behind them.
Why have the Visual Studio F5 container? Why so complicated! #
I could run Visual Studio in full container rebuild mode using DockerFile_API, but then I’d have to attach the debugger all the time.
Auto-reattach is probably a thing, but I wanted to just be able to F5 the solution.
The next option was to use dotnet watch in the API container and get hot reload ala the UI project, but I know there’s some issues with dotnet watch and I still want that F5 in VS to work.
The last option I explored was using Visual Studio to add Container Orchestration to the project.
The main issue here is that for some reason the combination of Visual Studio, Docker Compose, and WSL was not a happy one. VS seems to pass the wrong path to Docker Compose OR Compose doesn’t understand the path in the way it was given.
Even when I File –> new project with Container Orchestration and F5, it fails to read the path to the docker compose file.
I suspect this is a bug in one of the three applications involved, and I’m not sure which!
My investigation stopped there, so it may well be possible to get this running.
I’ve just tried this again, and it’s working. 😕
Not sure what’s changed, but I may revisit this later.
In the end, I chose to have the Visual Studio container running OUTSIDE the docker compose stack, but with the same internal name and connected to the stack network.
This way, the proxy address in the UI is the same for the F5 AND stack containers.
Revisiting!! #
I did manage to get Docker Compose working from Visual Studio, but it felt flakey and seems to have the same caveats as the way I’ve done it in this post.
Feel free to
take a look but I won’t bother including it here.
Do I need NodeJS installed on WSL? #
As alluded to earlier, I broke my Node install…
Here’s a method without Node installed in WSL
This is more personal taste flavoured by inexperience with Docker and WSL.
Currently, I work a lot with npm, so running projects by doing npm run ... is natural, and I know where to look for the commands I have available in the project (package.json)
If I did the whole thing in Docker, I’d have to remember all the docker commands to make things do what I wanted, and so would any new dev coming onto the project.
Now, that may end up being superior as we’d get more control, more understanding, less complexity, and we could remove node, leaving Docker and WSL the only requirements, but for now it’s easier to get running this way.
Other general stumbling blocks #
I wanted to access SQL from host, but had issues:
- SQL was installed on the host, and thus port conflicts
- Note in the SQL containers and compose script –> 1633:1433, which maps the default port sql server runs on from inside the container to 1633 on the host to avoid the conflict
- Sql Server host needs some network config to connect to “network” instances
- Computer Management –> Sql server configuration manager –> SQL server network configuration –> TCP/IP –> Enable, then make sure that in “IP addresses” make sure the ports are the same as we want (1433 is default)
Note I’m no longer convinced this is necessary, but it might help if you’re having connection troubles
- SQL was installed on the host, and thus port conflicts
I was unable to get SSL working for the API, not sure exactly why, but I suspect it was something about certificates.
Even after I told Kestral to run on port 5555, the container variables are still
+:80but it all connects fine…I’m not sure what’s going on there.The F5 container doesn’t stop running when you press the “Stop” in the IDE.
When npm packages are added or changed, the whole container will need rebuilding. Docker Compose SHOULD know about this change ( diffs package.json as text)
What about running tests and other useful things? #
Currently VS2022 does not support running tests in Docker.
You can build a docker setup to run the tests, and output a trx file that the VS Test explorer can read, but I decided that was too complicated to be worth it.
A much more sensible way would be to have a Docker container setup which ran dotnet test live and ran the tests on change.
What about WITHOUT NodeJS on WSL? #
After writing up most of this post, I went back to get some screenshots of the dev experience and discovered that…npm wasn’t found? What?
Several Stackoverflows and documentation pages later, I’m wondering how it was ever working. I have
nvm for Windows installed on the host, which is on the Windows path, and the Windows path gets appended to the WSL environment.
So…all of the article will work fine, IF you don’t have node installed on the host and DO have it in WSL.
I also realised that the whole point of this was to eliminate as many dependencies for the user as possible, and I was expecting a NodeJS dependency in WSL…

Let’s see what we can do about that.
Working with a dev-only NodeJS Docker container #
I’ll adjust Dockerfile_UI and docker-compose.yaml to add a new definition:
DockerFile_UI
# Rest of the file from before
# Expose a dev node environment where we can execute npm commands
# This is where you change npm packages, e.g.
FROM node:14-alpine AS nodeexec
ENV NODE_ENV=development
WORKDIR /appdocker-compose-yaml
# Allow us to execute node/npm commands without having node installed
# This is where you change npm packages (e.g.) with "docker compose run --rm nodeexec npm install cordova"
nodeexec:
container_name: yolo-swaggins-nodeexec
image: yolo-swaggins-nodeexec
build:
context: ./UI
dockerfile: DockerFile_UI
target: nodeexec
volumes:
- ./UI:/appThis creates a container that is basically just Node (14 in this case) and nothing else.
Now we can run docker compose run --rm nodeexec npm install cordova which runs the command in the container, which has access to the source code by volume mounts in docker compose.
This is the way to add/update/remove npm packages.
We could also add an alias to ~/.bashrc to make it easier to run it: alias npmrun="docker compose up --rm nodeexec npm so I can run npmrun ci or npmrun install cordova.
Is this easy to use? Not really, so let’s look for something better.
Always-on Node Dev Container #
The nodeexec container and associated commands spin up the container, run the commands, then shutdown the container.
This means commands can only be run in the root directory. I want to see if I can get a Node environment I can execute anywhere in the codebase.
We can get a shell into the container by running docker compose run nodeexec sh from the root, which we can do whatever we want with, but has the nice effect of keeping the container alive.
I’ve added a script for non-docker users to get up and running quickly, which runs the database and UI, then gives you a shell into the UI as you would normally have when working with CRA.
start-dev-environment.sh
bash
docker compose up -d ui sql
docker compose run --rm nodeexec shdocker compose up -d ui sql
docker compose run --rm nodeexec shThere are some other scripts in there to run pieces separately, or the whole thing, but this would be the starting point.
You’d then run the Api solution in Visual Studio as normal.
Execute anywhere? #
I’m well off the rails now, but curiosity got the better of me.
With the nodeexec container running the shell, we can execute commands against that container (and it’s volume mounts) from anywhere in WSL with docker compose exec nodeexec npm install cordova, essentially doing dev entirely inside Docker containers!
For some reason, this felt useful, but you shouldn’t need it if you have a shell into the container anyway…
Conclusions #
Docker is a powerful, but confusing piece of software.
At times, it feels equally powerful and worthless.
I think “Why containers, why not just metal?” then I open a project that needs Node 10 and spend ages wondering why things aren’t quite working.
I also feel like some of the complications are due to my misunderstanding Docker and WSL, and there could be a simple way to do all this.
Did I succeed in my goals? #
In general, I think things worked out fairly well.
There’s some setup involved, some different ways of working, and issues like Visual Studio tests not working with the Test Explorer, npm scripts in package.json not as useful as I wanted, etc, but ultimately this feels like a step forward for future projects, and I look forward to more Docker fun!
Readings #
Primary resource:
https://mherman.org/blog/dockerizing-a-react-app/
https://docs.docker.com/samples/aspnet-mssql-compose/
https://blog.logrocket.com/docker-sql-server/
https://docs.microsoft.com/en-us/sql/linux/sql-server-linux-docker-container-deployment?view=sql-server-ver15&pivots=cs1-bash
https://docs.microsoft.com/en-us/sql/linux/quickstart-install-connect-docker?view=sql-server-ver15&preserve-view=true&pivots=cs1-bash
https://www.pluralsight.com/blog/software-development/how-to-build-custom-containers-docker
https://www.section.io/engineering-education/build-and-dockerize-a-full-stack-react-app-with-nodejs-and-nginx/
https://towardsdatascience.com/deploying-a-react-nodejs-application-with-docker-part-i-of-ii-910bc6edb46e
https://medium.com/geekculture/getting-started-with-docker-in-your-react-js-application-the-basics-6e5300cf749d
Looots of stack overflow
Github #
Convenience: Final Dockerfiles side by side with relevant docker compose sections #
Database #
Dockerfile_SQL
Expand/Collapse
docker
FROM mcr.microsoft.com/mssql/server:2019-latest

WORKDIR /app

COPY . .

# Set scripts to be executable. Note that I had to change user for permissions.
USER root
RUN chmod +x ./initialise-sql.sh
RUN chmod +x ./entrypoint.sh
USER mssql

CMD /bin/bash ./entrypoint.shFROM mcr.microsoft.com/mssql/server:2019-latest
WORKDIR /app
COPY . .
# Set scripts to be executable. Note that I had to change user for permissions.
USER root
RUN chmod +x ./initialise-sql.sh
RUN chmod +x ./entrypoint.sh
USER mssql
CMD /bin/bash ./entrypoint.shUI Compose service
Expand/Collapse
yml
# Database Container spec.
sql:
container_name: yolo-swaggins-sql
image: yolo-swaggins-sql
environment:
ACCEPT_EULA: 'Y'
SA_PASSWORD: 'y0l0Swaggins'
build:
context: ./DockerDB
dockerfile: DockerFile_SQL
ports:
- 1633:1433 # Map 1433 from inside the container to 1633 host to avoid port conflict with local install# Database Container spec.
sql:
container_name: yolo-swaggins-sql
image: yolo-swaggins-sql
environment:
ACCEPT_EULA: 'Y'
SA_PASSWORD: 'y0l0Swaggins'
build:
context: ./DockerDB
dockerfile: DockerFile_SQL
ports:
- 1633:1433 # Map 1433 from inside the container to 1633 host to avoid port conflict with local installAPI #
Dockerfile_API
Expand/Collapse
docker
# This is the Dockerfile we use during the main stack build.
# NOT used for F5 in Visual Studio, that's in ./DockerTest

# This is essentially what I got from doing Right Click --> Add --> Docker support on the project
# I've just fixed the paths and exposed port 5555
FROM mcr.microsoft.com/dotnet/aspnet:6.0 AS base
WORKDIR /app
EXPOSE 80
EXPOSE 443
EXPOSE 442
EXPOSE 5555

FROM mcr.microsoft.com/dotnet/sdk:6.0 AS build
WORKDIR /src
COPY ["./DockerTest/DockerTest.csproj", "/src"]
RUN dotnet restore "/src/DockerTest.csproj"
COPY ./DockerTest .
RUN dotnet build "/src/DockerTest.csproj" -c Debug -o /app/build

FROM build AS publish
RUN dotnet publish "/src/DockerTest.csproj" -c Debug -o /app/publish

FROM base AS final
WORKDIR /app
COPY --from=publish /app/publish .
ENTRYPOINT ["dotnet", "DockerTest.dll"]
# This is the Dockerfile we use during the main stack build.
# NOT used for F5 in Visual Studio, that's in ./DockerTest
# This is essentially what I got from doing Right Click --> Add --> Docker support on the project
# I've just fixed the paths and exposed port 5555
FROM mcr.microsoft.com/dotnet/aspnet:6.0 AS base
WORKDIR /app
EXPOSE 80
EXPOSE 443
EXPOSE 442
EXPOSE 5555
FROM mcr.microsoft.com/dotnet/sdk:6.0 AS build
WORKDIR /src
COPY ["./DockerTest/DockerTest.csproj", "/src"]
RUN dotnet restore "/src/DockerTest.csproj"
COPY ./DockerTest .
RUN dotnet build "/src/DockerTest.csproj" -c Debug -o /app/build
FROM build AS publish
RUN dotnet publish "/src/DockerTest.csproj" -c Debug -o /app/publish
FROM base AS final
WORKDIR /app
COPY --from=publish /app/publish .
ENTRYPOINT ["dotnet", "DockerTest.dll"]Api Compose Service
# API container spec.
api:
container_name: yolo-swaggings-api
image: yolo-swaggins-api
build:
context: ./Api
dockerfile: DockerFile_API
environment:
ASPNETCORE_ENVIRONMENT: Development
ASPNETCORE_URLS: http://+:5555UI and nodeexec #
Dockerfile_UI
Expand/Collapse
docker
FROM node:14-alpine AS development

WORKDIR /app

# This is separate so layers are cached nicely
COPY ./package.json .
COPY ./package-lock.json .

RUN npm ci
CMD ["npm", "start"]
# Expose a dev node environment where we can execute npm commands
# This is where you change npm packages, e.g.
FROM node:14-alpine AS nodeexec
ENV NODE_ENV=development
WORKDIR /appFROM node:14-alpine AS development
WORKDIR /app
# This is separate so layers are cached nicely
COPY ./package.json .
COPY ./package-lock.json .
RUN npm ci
CMD ["npm", "start"]
# Expose a dev node environment where we can execute npm commands
# This is where you change npm packages, e.g.
FROM node:14-alpine AS nodeexec
ENV NODE_ENV=development
WORKDIR /appUI Compose Service
Expand/Collapse
yml
# UI Container spec. note that 'ui' is the name of the container internally (also 'container_name')
ui:
  container_name: yolo-swaggins-ui
  image: yolo-swaggins-ui
  environment:
    - CHOKIDAR_USEPOLLING=true  # This allows CRA to hot reload over the file system barrier
    - BROWSER=none
    - NODE_ENV=development
  build:
    context: ./UI
    dockerfile: DockerFile_UI
    target: development
  volumes:
    - ./UI:/app  # Mount these as volumes so we can watch them.
    - /app/node_modules  # I think this was so it didn't overwrite or copy or something...
  ports:
    - 3000:3000

nodeexec:
container_name: yolo-swaggins-nodeexec
image: yolo-swaggins-nodeexec
build:
  context: ./UI
  dockerfile: DockerFile_UI
  target: nodeexec
volumes:
  - ./UI:/app
# UI Container spec. note that 'ui' is the name of the container internally (also 'container_name')
ui:
container_name: yolo-swaggins-ui
image: yolo-swaggins-ui
environment:
- CHOKIDAR_USEPOLLING=true # This allows CRA to hot reload over the file system barrier
- BROWSER=none
- NODE_ENV=development
build:
context: ./UI
dockerfile: DockerFile_UI
target: development
volumes:
- ./UI:/app # Mount these as volumes so we can watch them.
- /app/node_modules # I think this was so it didn't overwrite or copy or something...
ports:
- 3000:3000
nodeexec:
container_name: yolo-swaggins-nodeexec
image: yolo-swaggins-nodeexec
build:
context: ./UI
dockerfile: DockerFile_UI
target: nodeexec
volumes:
- ./UI:/app